Started out today cleaning my basement/studio. After scrambling to get Christmas gifts made and other presents wrapped my basement looked like a bomb went off. Now it's reasonably neat and again a comfortable place for me to work. I can put up with the mess for a while but then it begins to get to me and I can't concentrate on any thing.
Once every thing was in order and the shop vacuum used I sat down at my beading desk and went brain dead. I usually have a gazillion ideas running around in my head but not today. Then I got the bright idea to go through my beading/jewelry magazines. I decided that when I came to a design I like, that I haven't tried before, I'd use that design for inspiration. I say inspiration because just like my cooking and sewing I view the directions as suggestions.
Usually I'll go through a stack of magazines and mark what I'm interested in trying but then I'd move on, flipping pages and marking. A lot of times I'd have a stack of marked magazines and never get back to the article. This time I'm stopping when I see something and using the article, complete a project before moving on to another design. So far it's working and I've made a new bracelet and earrings.
During this past year I've purchased several tools/beads/findings that I haven't used - yet. I'm looking at this as the start of a new year and new ideas. I hope to be able to complete a lot more projects without buying a bunch of new stuff. Believe that? Me either! But I'm going to try.
Sunday, December 26, 2010
Friday, December 24, 2010
Merry Christmas
More room to write here than Facebook.
It's a winter wonderland out side. Everything covered in white and beautiful. Spent the day making goodies for tomorrow's Christmas party at my niece Jeanne's.
Made a very simple candy treat from a recipe I got at work. Simple, the best kind. You mash up a package of Oreo cookies, mix in 8 oz of softened cream cheese, form it into balls and chill till firm. Once they're firm you cover them in melted chocolate. So simple but so good.
After that I got the bright idea to use gingerbread graham crackers for the filling. Since they don't have the filling of Oreos they were a little dry. Solved that by melting a stick of butter and added that to the mixture along with about 1/4 cup sugar and 1 teaspoon ground cloves. Of course keeping it real simple I did all the mixing in the food processor. YUM.
For the final item I made 2 cheese cakes. These were at the request of my nephew, Nick. I hear they're his favorite but we all seem to like them. I also made fruit salsa to top the cheese cake if desired or just to eat with graham crackers.
Took a few minutes to finish wrapping the gifts for tomorrow. Now all that's left to do is get there. I'm really looking forward to seeing everyone. My favorite part of Christmas is visiting with family that I love but don't get to see as often as I'd like.
Sunday, December 19, 2010
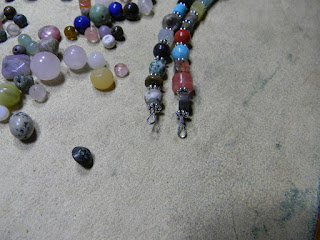
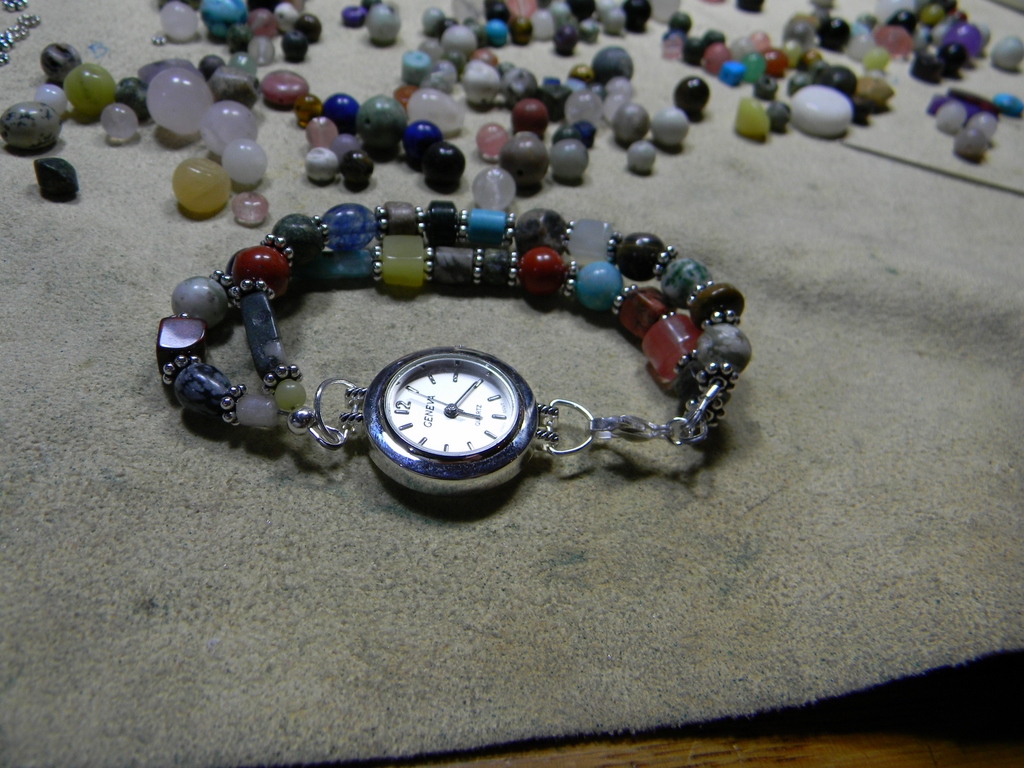
Gem Stone Watch
This was a very productive weekend. Below you can see the process of assembling a two strand gemstone bracelet watch. Not a whole lot of description here. I strung two strands of gemstones on flexible beading wire and attached them to a pre-made watch face.


Simple Dangle Earrings
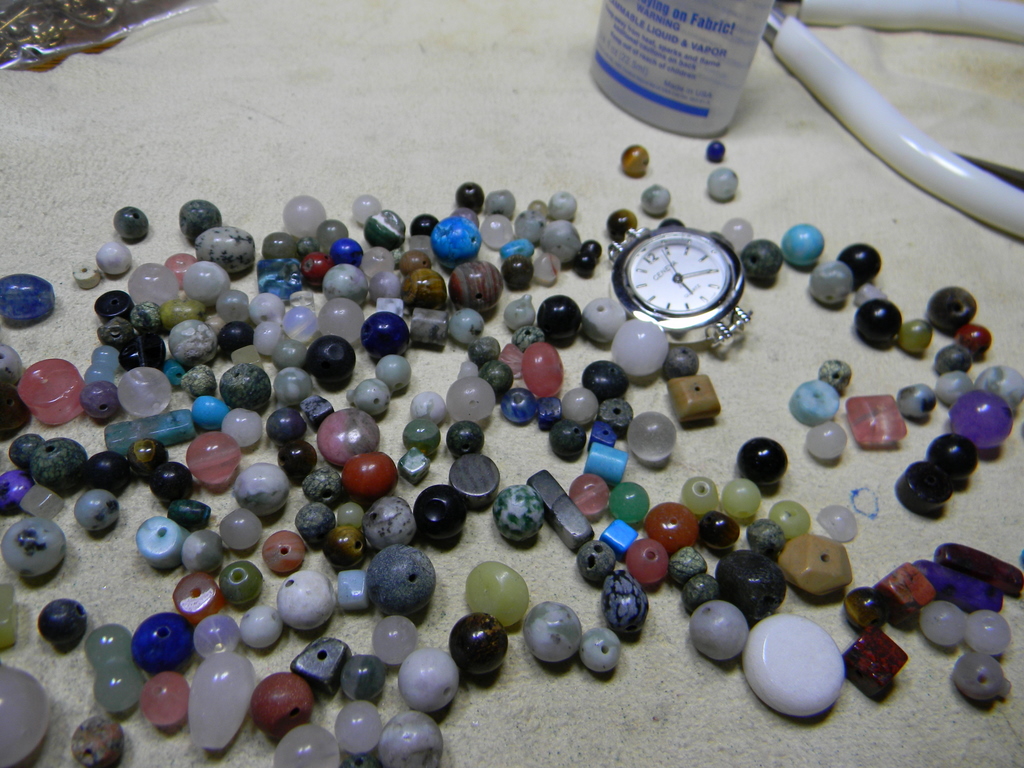
A friend mentioned that she'd really like to have some earring made from Rose Quartz. That got me digging out my supply of rose quartz and making several pairs of earrings. Here's the process for making a pair of simple dangle earrings. I've found out that it's really tricky photographing the process while doing the work. Since I was photographing as I go you'll also get to see my messy work area in the background.
Below is some of my rose quartz stash. I have finished nuggets, chips - large & small and various other shapes.

To make earrings you need earring findings as well as the pretty stones or beads. For these earrings I'll use silver head pins and silver ball post earrings with a loop for attaching the earrings. I've also used some silver, flower shaped bead caps and tiny silver spacer beads. To attach the earrings to the post you'll need a couple split jump rings.

To begin I added the following things to the head pin. 1 silver ball, 1 bead cap, 1 large faceted quartz nugget, 1 bead cap, 1 small silver ball, 1 small faceted quartz nugget and finally another silver ball.

Once everything is on the head pin I used my chain nose pliers to make a 90 degree bend in the head pin.

Then I used my round nose pliers to make a loop in the head pin.


After making the loop I used my bent nose pliers to hold the loop so I could use my chain nose pliers to make wrapped loops with the remaining wire of the head pin. Carefully make the loops parallel and tight to each other.


After several wraps use wire cutters to trim the remaining wire close to the wraps and press the end down tight to the head pin.

To attach the earring to the ball post open a jump ring and slip on the earring and the loop of the ball post. I use the smallest jump ring possible that will still allow some movement of the earring. To open and close jump rings use two pairs of pliers, one on either side of the opening of the jump ring, and use a back and forth motion instead of pulling the opening of the ring apart. Make sure to close the jump ring so there is no gap.


Repeat the process to make the second earring. Simple and easy!

Below is some of my rose quartz stash. I have finished nuggets, chips - large & small and various other shapes.
To make earrings you need earring findings as well as the pretty stones or beads. For these earrings I'll use silver head pins and silver ball post earrings with a loop for attaching the earrings. I've also used some silver, flower shaped bead caps and tiny silver spacer beads. To attach the earrings to the post you'll need a couple split jump rings.

To begin I added the following things to the head pin. 1 silver ball, 1 bead cap, 1 large faceted quartz nugget, 1 bead cap, 1 small silver ball, 1 small faceted quartz nugget and finally another silver ball.

Once everything is on the head pin I used my chain nose pliers to make a 90 degree bend in the head pin.

Then I used my round nose pliers to make a loop in the head pin.


After making the loop I used my bent nose pliers to hold the loop so I could use my chain nose pliers to make wrapped loops with the remaining wire of the head pin. Carefully make the loops parallel and tight to each other.


After several wraps use wire cutters to trim the remaining wire close to the wraps and press the end down tight to the head pin.

To attach the earring to the ball post open a jump ring and slip on the earring and the loop of the ball post. I use the smallest jump ring possible that will still allow some movement of the earring. To open and close jump rings use two pairs of pliers, one on either side of the opening of the jump ring, and use a back and forth motion instead of pulling the opening of the ring apart. Make sure to close the jump ring so there is no gap.


Repeat the process to make the second earring. Simple and easy!

Saturday, December 4, 2010
Random Glass Necklace part 2
All the parts are completed and ready to connect.

To build the necklace I used 6mm jump rings to connect 1 bead with a wrapped loop on each end, 3 headpin dangles and 1 bead with wrapped loops. Continue adding wrap loop beads alternating with 3 dangle units until all units are attached. I don't put dangles at the clasp ends of the necklace.

Here's the necklace with everything except the clasp attached. I used a small snap/button type clasp for a closure and soldered all the jump rings closed. That's easier said than done since the beads keep wanting to get in the way of the soldering iron. I used Stay Brite solder and flux with a low temp soldering iron.


Here's the necklace with the clasp attached, the jump rings soldered and everything cleaned.


Now I'll have to take another jewelry break to do some sewing. I promised my granddaughter, Emily, that I'd make a Christmas dress with snowflakes. Yes this is the same granddaughter that got the Glenda costume for Halloween. And yes she has me wrapped around her little finger.
In case you missed seeing her completed costume here is another picture.

Wednesday, December 1, 2010
Random Glass Necklace
Every time I wear the necklace I made from random glass beads and wire someone comments on it. I made it just to use left over beads but it has become one of my favorite necklaces because it goes with almost every thing. I decided to use that necklace for inspiration. I recently purchased several strings of lampwork beads and that's the base for the new necklace.
Here's a couple shots of the inspiration necklace.


And the bead stash. Not going to use all of them but will dig out what I want. Actually may end up making a couple necklaces or maybe a matching cha-cha bracelet and of course earrings.

To start I used 20 gauge Artistic silver wire and wired up 17 beads for the main part of the necklace. Each bead has a wrapped loop in both ends.


For the dangling sections I used head pins to attach smaller beads. I'll use 3 sets of beads on headpins between every main bead section. Everything will be strung together with jump rings and the rings will then be soldered. I tried making the original necklace without soldering the jump rings and things tended to fall off.


I don't have near enough headpins filled but that will have to wait for another evening or possibly this weekend.
Sunday, November 28, 2010
Getting Ready For Christmas
I've been making jewelry for some Christmas gifts and I'd love to show them to you but that would give away the surprise. Honestly there's not too much technique involved with these gifts. I've strung several necklaces and made matching earrings for each necklace. For these necklaces I've used a combination of various stones and strung them on flexible beading wire to approximately a 20 inch length. I've used Jade, Jasper, Turquoise, Tourmaline and Rhodonite.
Now that the craft fairs are over I've also gone back to my lampwork. Right now just a few simple designs to get back in the swing of things. Lampwork is a weekend or holiday only thing for me. Evenings after work just don't allow enough time to play.
Also, in celebration of the Christmas season I've updated my ArtFire shop to give free shipping to addresses in the United States. Since I ship everything priority mail purchases should reach their destination in a week or less. There are a few new items in the shop so if you haven't looked lately you might find something you just can't live without or something that would be a perfect gift for someone on your list.
Saturday, November 20, 2010
Craft Fairs are Over
The two craft fairs, I've spent the last two weeks frantically preparing for, are over. Now I can take a deep breath and get back to my somewhat abnormal self. The fairs weren't as successful as I had hoped but they did give me some experience of working a fair. I will do it again but not wait till the last minute to get things ready.
Talking to other vendors at the fairs I learned that most everyone's sales were down. We all know our economy is in bad shape and it shows when crafters are trying to sell their wares.
I did enjoy meeting and talking to other crafters and the people that attended the fairs. There are so many talented people in this area. Today's fair had me next to a lady that raises Alpacas, spins their wool, and makes lovely soft scarves, hats, gloves, and really soft, cute teddy bears. Couldn't leave the fair without a bear.
Also meet a young lady just getting her start in the jewelry business. Looks like she's off to a good start with good designs and quality workmanship. I hope she continues to enjoy her craft and does well in the future.
I do have more jewelry to photograph and add to my ArtFire site. I also want to re-photograph the jewelry I already have on the site. I plan to get that done by next weekend. Tomorrow I intend to play with fire and get back to my lampwork.
Tuesday, November 16, 2010
Craft Fairs
I've been working like crazy to get extra jewelry finished before this weekend's craft fairs. So far so good and I have several new items that aren't listed on my ArtFire site. During the two days of the fairs the items in my ArtFire shop will be with me and inactive in the on-line shop.
If you are local to the Alton/Godfrey/Bethalto, Illinois area please come by and say hi. Of course I'd be more than happy to sell you some jewelry too.
The first fair is Friday, November 19th, from 10 to 2 at United Methodist Village in Godfrey http://unitedmethodistvillage.com. I know that one is hard to attend for people working, I had to take a vacation day from my regular job to do this fair. If you miss that one I will be selling my jewelry the next day in Bethalto. That fair is at the Knights of Columbus in Bethalto, http://local.yahoo.com/info-17553560-knights-of-columbus-bethalto November 20th, from 10 to 3.
If there is something in my shop that you want to purchase please don't hesitate. I can either send it to you or you can pick it up at one of the fairs. If you have questions please feel free to contact me at llrodenjewelry@gmail.com.
Wednesday, November 10, 2010
Handmade Holiday
I'm currently working to get ready for my first craft show and every spare minute will be used until the show begins on November 19th. While that's going on I'm also making plans for holiday projects.
It's my job at work to decorate the office holiday wreaths. We usually hang 7 wreaths around the office and 5 of those wreaths have to be distinctly different for every other wreath in the office. For some of those I'm thinking about French wire designs.
My granddaughter, Emily, has picked out material and charms for a "snowflake" Christmas dress. I'm planning to begin that project over the Thanksgiving break from my regular day job. Several of my other family members enjoy receiving gifts of my handmade jewelry so those projects are in the planning stages too.
There are so many new ideas running around in my head. In addition to my jewelry I am thinking about some beaded purses and possibly dolls in the coming new year. It's been a while since I was able to do any lampworking and I'm having withdrawal from that. My grandson has asked for more of my lampwork beads to use in his jewelry projects.
Lots to do. I need to add about 24 hours to my day.
Thursday, November 4, 2010
Blue Crystal Necklace
My Blue Crystal Necklace has been added to the designers gallery on Firemountain Gems and Beads. Here's the link to the gallery.
http://www.firemountaingems.com/galleryofdesigns/snapshots_design_gallery.asp?docid=AA4X&sact=search
For those of you that have been following my blog you have seen the construction process from start to finish. If you would like to see it again or haven't seen it yet the first post was listed September 7, 2010.
Tuesday, November 2, 2010
Craft Fairs
I've been spending as much free time as I have to get ready for two up-coming craft fairs. This past weekend was spent in Kentucky babysitting grandchildren but they love making jewelry so we had us a little beading party.
A couple years ago I took a bunch of odd and end beads and jewelry findings to these kids, just to give them something to do so I could continue working on some on-going projects. Got them hooked big time. My son is complaining that I've created monsters. The way I look at it, it's good eye/hand coordination skill building. Now they have a large stash of beads that they've bought with their allowance and I usually take more for them each time we visit.
While baby sitting I was able to produce eight beaded rings to sell. Didn't get much done but every little bit helps. While making the rings my Granddaughter was begging for her own ring and one for her friend. Of course I HAD to comply. For the craft fairs I will have the items listed on my web site as well as the extra things I'll be making over the next couple of weeks. Once done I'll take a group photo of all the new stuff.
The fairs are November 19th from 10:00 am to 2:00 pm at United Methodist Village in Godfrey, Illinois and November 20th from 10:00 am to 2:00 pm at Bethalto Knights of Columbus in Bethalto, Illinois. I'm not totally sure about the time for the Bethalto fair and will post an update if anything changes.
Tuesday, October 26, 2010
Final Phase
Finally done! In this picture the background beading is finished and the foundation material needs to be trimmed close to the edge of the beading. Notice I said close. Actually you need to leave some material around the edge to keep the beaded areas from pulling out if you cut too close. I usually leave about 1/4 inch around the outside.

I learned a lesson from the first bracelet I made. I sold it to a friend and while she was wearing it in New Orleans, someone grabbed it right off her wrist. Now when I make these bracelets I sandwich a loop of vinyl coated beading wire between the front and back layers of material. I run the wire through the closures so the wire and hooks take all the stress of wear and make it a lot more secure. For this bracelet I used heavy duty black hook and eye closures. You can see the wire at the bottom of this photo. I knew I wanted the bracelet to fit a 7 1/2 inch wrist so the wire is measured to a little over double that length and secured with crimp beads. I used crimp beads just below each end and again in the center.

Here's the bracelet with the material trimmed and the center moon face embellished with clear crystal tear-drop beads and alternating with crystal bi-cones. See the smudges on the surface of the faces? I use smoke Fireline to sew on the beads. The finish on the Fireline comes off on your hands and in the process gets on the polymer faces. It took a light sanding to get the faces back in shape.

The smaller moon faces are embellished with black and smoke color tear-drop beads alternated with crystal and ab crystal bi-cones. The embellishment on the smaller faces doesn't encircle the entire face. I wanted the main accent to be on the center face.

I've attached another layer of black ultra suede to the back of the bracelet to enclose the wire support and to hide all the beading stitches. I stitched the two layers of material together with a running stitch to hold it in place while I beaded around the edges. By stitching close to the edges I could hide the running stitches with the beaded edge.

Here's the completed bracelet all cleaned up and ready to go. I finished the surface of the faces with micro-crystalline wax. The wax goes on wet but drys quick. Once it's dry it buffs to a nice soft shine and provides a protective coating to the jewelry.

Monday, October 18, 2010
Lastest Phase
I didn't get as far as I had hoped this weekend. Hopefully I'll have enough time in the evenings during the week to get most of the front done. Between the time I did have on the weekend and the hour and a half I had this evening I did get a little bit done.

You can see the background building up a little bit. The beads are added two at a time and back-stitched for extra security. As the beads are added the bracelet begins to curve. It also makes it a little easier to stitch because it doesn't flop around as much. With the black back ground it's hard to see just how many beads have been added. Once all the beads are put in place the extra material will be trimmed from the sides and a backing attached.

You can see the background building up a little bit. The beads are added two at a time and back-stitched for extra security. As the beads are added the bracelet begins to curve. It also makes it a little easier to stitch because it doesn't flop around as much. With the black back ground it's hard to see just how many beads have been added. Once all the beads are put in place the extra material will be trimmed from the sides and a backing attached.
Saturday, October 16, 2010
Advancing Moon Phases
The phases have their peyote stitched bezels. The full moon is stitched with silver lined crystal beads at the base and white seed beads at the top. The waxing and waning phases are stitched with silver lined gray beads on the white side and silver lined black beads on the black side. The tops are white and black beads.

After stitching around the faces the stiff backing was trimmed and the faces were attached to the black backing material that makes up the base of the bracelet. The base will be fully stitched with beads. A few rounds have been stitched and I hope to finish up the beading tomorrow.

There is more material here than will be in the finished bracelet. I've found out from experience that the material tends to draw up as you stitch so I left some extra around the edges. When it's fully stitched it will measure about 7 inches long.
Sunday, October 10, 2010
The New Other Thing
I'm making another "face" bracelet. This one will be phases of the moon. I made the faces a few days ago in expectation of taking them with me to work on while we were making our Kentucky Halloween costume delivery and sitting in the hotel room Saturday night. Unfortunately I didn't have the needle I needed but come to find out it didn't matter because we were baby sitting Saturday instead of sitting in the hotel. Not so unfortunate after all.
We're back home now and I've begun the beading around the faces. This is just the start and again I'll be posting updates as they become available.

My plan is to use various shades of silver, white and black beads corresponding with the color of the section of the face I'm working around. I want the full moon to kind of glow and really stand out in the center of the bracelet. The other faces will be worked with white and black beads, depending on which side of the bead is black or white, I think you get the idea.
Watch this space to see if what's in my head really works out. I'm frequently working around happy accidents.
Glenda arrives
We were able to deliver the Glenda costume this weekend and luckily it fit. Emily was thrilled. I think she liked the high-heel shoes as much as she likes the costume but all in all I'm so glad she did like it and that it fit. I also made pants and bought a t-shirt for her friend Bryce so he can dress as Shaggy from the cartoon, Scooby Doo.

Notice the high-heel shoes and crown make Emily as tall as Bryce. She noticed that right away. This grandma certainly needs to improve her camera skills and I'm trying.
Now the costumes are put away to wait for Halloween and I'm on to other projects.

Notice the high-heel shoes and crown make Emily as tall as Bryce. She noticed that right away. This grandma certainly needs to improve her camera skills and I'm trying.
Now the costumes are put away to wait for Halloween and I'm on to other projects.
Saturday, October 2, 2010
Considering Glenda
There's an old saying in my family; "Considering what it is and who it's for, that's good enough". In that case, considering this is a Halloween costume for a 6 year old, this is good enough. It's finally as complete as it's going to get.
I'll be repeating myself with some of the description but here goes.
The dress is pink costume satin with tulle sleeve caps, bodice decoration and two layers of tulle on the skirt. The stars and dots are glitter glue or paint. Once all the paint and glue was dry I added a few stick-on rhinestones to the center front for some extra bling.

You can see the wand at the side of the picture. It is made from two layers of glow in the dark polymer clay and decorated with glitter glue and red glass "jewels". The handle is a dowel rod that was painted with gray paint and glitter paint for a second coat. It's about 3 1/2 feet long, so just about as tall as Emily.
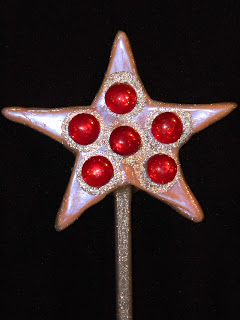
Here's a closer look at the top of the wand. It really does glow in the dark.
Last but not least - actually the crowning glory is the crown. It is made from the satin left over from the dress. I covered that with 8 layers of Mod Podge, 4 front and 4 back. At each point is a bundle of paper coated floral wires, spiraled at top and bottom then glued to the crown. When the glue dried I painted the wires with glitter glue and painted random dots of glitter on the surface of the crown. On the top spirals I stuck some more rhinestones and the center front is also decorated with rhinestones.

Below is a closer look at the center front section of the crown.

This whole costume is a testament to Walmart and Michaels craft supplies. Everything except the dowel rod for the wand came from either one of these stores. This really was fun, even though it took a lot longer than I expected.
I'll be repeating myself with some of the description but here goes.
The dress is pink costume satin with tulle sleeve caps, bodice decoration and two layers of tulle on the skirt. The stars and dots are glitter glue or paint. Once all the paint and glue was dry I added a few stick-on rhinestones to the center front for some extra bling.

You can see the wand at the side of the picture. It is made from two layers of glow in the dark polymer clay and decorated with glitter glue and red glass "jewels". The handle is a dowel rod that was painted with gray paint and glitter paint for a second coat. It's about 3 1/2 feet long, so just about as tall as Emily.
Here's a closer look at the top of the wand. It really does glow in the dark.

Last but not least - actually the crowning glory is the crown. It is made from the satin left over from the dress. I covered that with 8 layers of Mod Podge, 4 front and 4 back. At each point is a bundle of paper coated floral wires, spiraled at top and bottom then glued to the crown. When the glue dried I painted the wires with glitter glue and painted random dots of glitter on the surface of the crown. On the top spirals I stuck some more rhinestones and the center front is also decorated with rhinestones.

Below is a closer look at the center front section of the crown.

This whole costume is a testament to Walmart and Michaels craft supplies. Everything except the dowel rod for the wand came from either one of these stores. This really was fun, even though it took a lot longer than I expected.
Sunday, September 26, 2010
Cut, Color & Paste
This has been a very productive weekend on the Glenda project. Lots of cutting, painting and gluing and I can finally see the light at the end of the rainbow. I was hopping to get it all finished this weekend but it's kind of like a home improvement project that just keeps getting bigger and bigger.

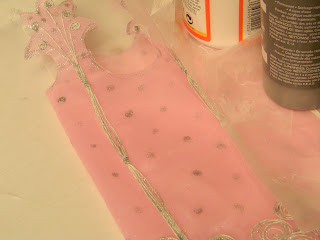
There wasn't a whole lot of progress on Saturday but I did get glitter glue dots on the bodice.

And the pattern laid out for the crown.

And the crown cut out.
Then a regular Saturday of getting groceries and stuff intruded.
I have had most of Sunday to get more done.

I put balloons in the sleeve caps so I could get the glitter stars on without getting them on the rest of the dress. This time I used Extreme Glitter Paint instead of glue. Wish I had found out about that stuff before I started the dress. It's a lot easier to use and dries a lot quicker than glitter glue.
I used white paper covered floral wires in bundles of 5 to make supports for each point of the crown. I spiraled the tops and bottoms of the wires and glued the full length of the bundle to the crown with supper tacky fabric glue. The wires had to be weighted down to make sure they stuck and didn't curl away from the material. The fabric glue dries very fast so I didn't have to wait too long to work on the decorations. Again I used the glitter paint, instead of glue, and painted each bundle of wires and made small glitter dots on the body of the crown.
When I had all but the seam finished and dried I overlapped and glued the seam and glued on the final bundle of spiraled wires. They are now sitting under the weights and I will paint them next time I get to work in the basement.

The star for the top of the wand is made from polymer clay. I sanded the star with wet sand paper and baked it again to make sure it was dry. Then I painted the edges with the glitter paint and sealed the front with glossy polymer glaze. Once that dried I used glitter glue to attach big, red, glass "jewels". I'll do the same to the back of the star once this dries.
The handle of the wand is a dowel rod that I tried to cover with silver leaf but that didn't work. I sanded all that off, used a rasp to shape the top of the dowel to fit into the star and painted the dowel with gray paint. When the gray paint dried I painted it again with glitter paint.
Not much more to go now. I can hardly wait to finish.

There wasn't a whole lot of progress on Saturday but I did get glitter glue dots on the bodice.

And the pattern laid out for the crown.

And the crown cut out.
Then a regular Saturday of getting groceries and stuff intruded.
I have had most of Sunday to get more done.

I put balloons in the sleeve caps so I could get the glitter stars on without getting them on the rest of the dress. This time I used Extreme Glitter Paint instead of glue. Wish I had found out about that stuff before I started the dress. It's a lot easier to use and dries a lot quicker than glitter glue.

I used white paper covered floral wires in bundles of 5 to make supports for each point of the crown. I spiraled the tops and bottoms of the wires and glued the full length of the bundle to the crown with supper tacky fabric glue. The wires had to be weighted down to make sure they stuck and didn't curl away from the material. The fabric glue dries very fast so I didn't have to wait too long to work on the decorations. Again I used the glitter paint, instead of glue, and painted each bundle of wires and made small glitter dots on the body of the crown.
When I had all but the seam finished and dried I overlapped and glued the seam and glued on the final bundle of spiraled wires. They are now sitting under the weights and I will paint them next time I get to work in the basement.

The star for the top of the wand is made from polymer clay. I sanded the star with wet sand paper and baked it again to make sure it was dry. Then I painted the edges with the glitter paint and sealed the front with glossy polymer glaze. Once that dried I used glitter glue to attach big, red, glass "jewels". I'll do the same to the back of the star once this dries.
The handle of the wand is a dowel rod that I tried to cover with silver leaf but that didn't work. I sanded all that off, used a rasp to shape the top of the dowel to fit into the star and painted the dowel with gray paint. When the gray paint dried I painted it again with glitter paint.
Not much more to go now. I can hardly wait to finish.
Subscribe to:
Posts (Atom)